How to Make a Bow with Organza Ribbon
Are you ready to infuse a touch of sophistication into your gifts or decorations? Crafting a stunning bow with organza ribbon is a simple yet rewarding DIY project that can elevate your wrapping game or add a delightful flourish to any craft project. We'll walk you through the steps of creating a beautiful bow with organza ribbon, making your gifts and decor stand out with a touch of elegance.
Materials You'll Need:
- Organza ribbon (choose your preferred color and width)
- Scissors
Step 1: Gather Your Supplies
Start by gathering the materials you'll need for this project. Choose an organza ribbon that suits your taste and complements the colors of your gift or craft project. Having all your supplies ready will make the process smoother.
Step 2: Measure and Cut the Ribbon
Decide on the size of your bow. Measure and cut the organza ribbon accordingly. Keep in mind that a longer length will result in a fuller bow, so adjust based on your preference and the size of your project.
Step 3: Create a Loop
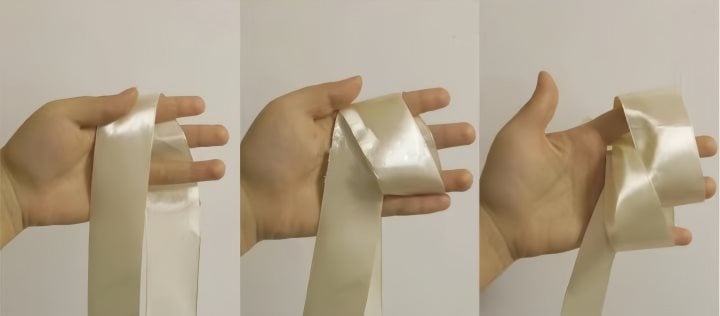
Hold one end of the ribbon in your hand, leaving a small tail hanging. Make a loop by folding the ribbon over your fingers, creating a half-circle shape. The size of this loop will determine the overall size of your bow.

Step 4: Form the Second Loop
Hold the base of the first loop between your fingers. Create a second loop on the opposite side, mirroring the first loop. Ensure that both loops are roughly the same size to maintain balance in your bow.
Step 5: Secure the Center
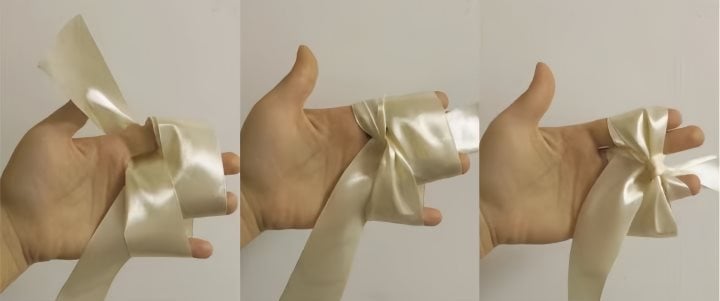
With one hand, hold the center of the loops together. Use the small tail left hanging to tie a knot or wrap around the center tightly. This will secure the loops in place.

Step 6: Fluff and Adjust
Gently fluff out the loops of your bow to achieve a fuller and more balanced look. Adjust the size and shape of the loops until you're satisfied with the overall appearance of your bow.
Step 7: Trim Excess Ribbon
Trim the excess ribbon from the tails of your bow to your desired length. You can cut the tails at a diagonal angle for a polished finish or leave them straight for a modern look.
Step 8: Attach to Your Project
Your organza ribbon bow is now ready to be attached to your gift or craft project. You can use the tails to tie the bow directly or use additional ribbon to secure it in place. Experiment with different attachment methods to achieve the desired effect.
Step 9: Admire Your Handiwork
Step back and admire your beautifully crafted organza ribbon bow. The sheer elegance and simplicity of this bow-making process make it a delightful addition to any gift or decoration, creating an instant visual appeal.
Conclusion: Enjoy the Art of Bow-Making with Organza Ribbon
Creating a bow with organza ribbon is a simple and enjoyable DIY project accessible to everyone. Whether you're enhancing a gift, decorating your home, or adding a special touch to a craft project, the versatility of organza ribbon bows makes them a go-to choice for any occasion. So, gather your supplies, follow these easy steps, and let the art of bow-making with organza ribbon become a delightful and rewarding part of your creative endeavors.